You know what's frustrating? When you pull open a dresser drawer and the whole thing tilts forward, gets stuck, or feels like it's about to fall out.
And if you're anything like me, you probably assume something major is broken.
But here's something you might not know: sometimes all you need to fix a broken dresser drawer is a tiny plastic replacement part!
Yep. A little piece of plastic that can cost less than $3.
On dressers with a center drawer runner, there's often a small plastic guide attached to the back of each drawer. Over time, that guide can crack or break from everyday use, especially when drawers are overloaded or repeatedly pulled open and closed.
The good news? Replacing it is one of the easiest furniture repairs you can do yourself.
I'm going to show you exactly how I fixed mine.
Why Does My Dresser Drawer Keep Falling Forward?
Before you replace a drawer or give up on an old dresser entirely, take a look at the back of the drawer.
If your dresser has a center-track drawer system like mine, you'll likely find a small plastic drawer guide attached to the back.
That little piece helps keep the drawer aligned with the runner as you open and close it.
When it breaks, your drawer might start tilting, catching, or sliding unevenly.
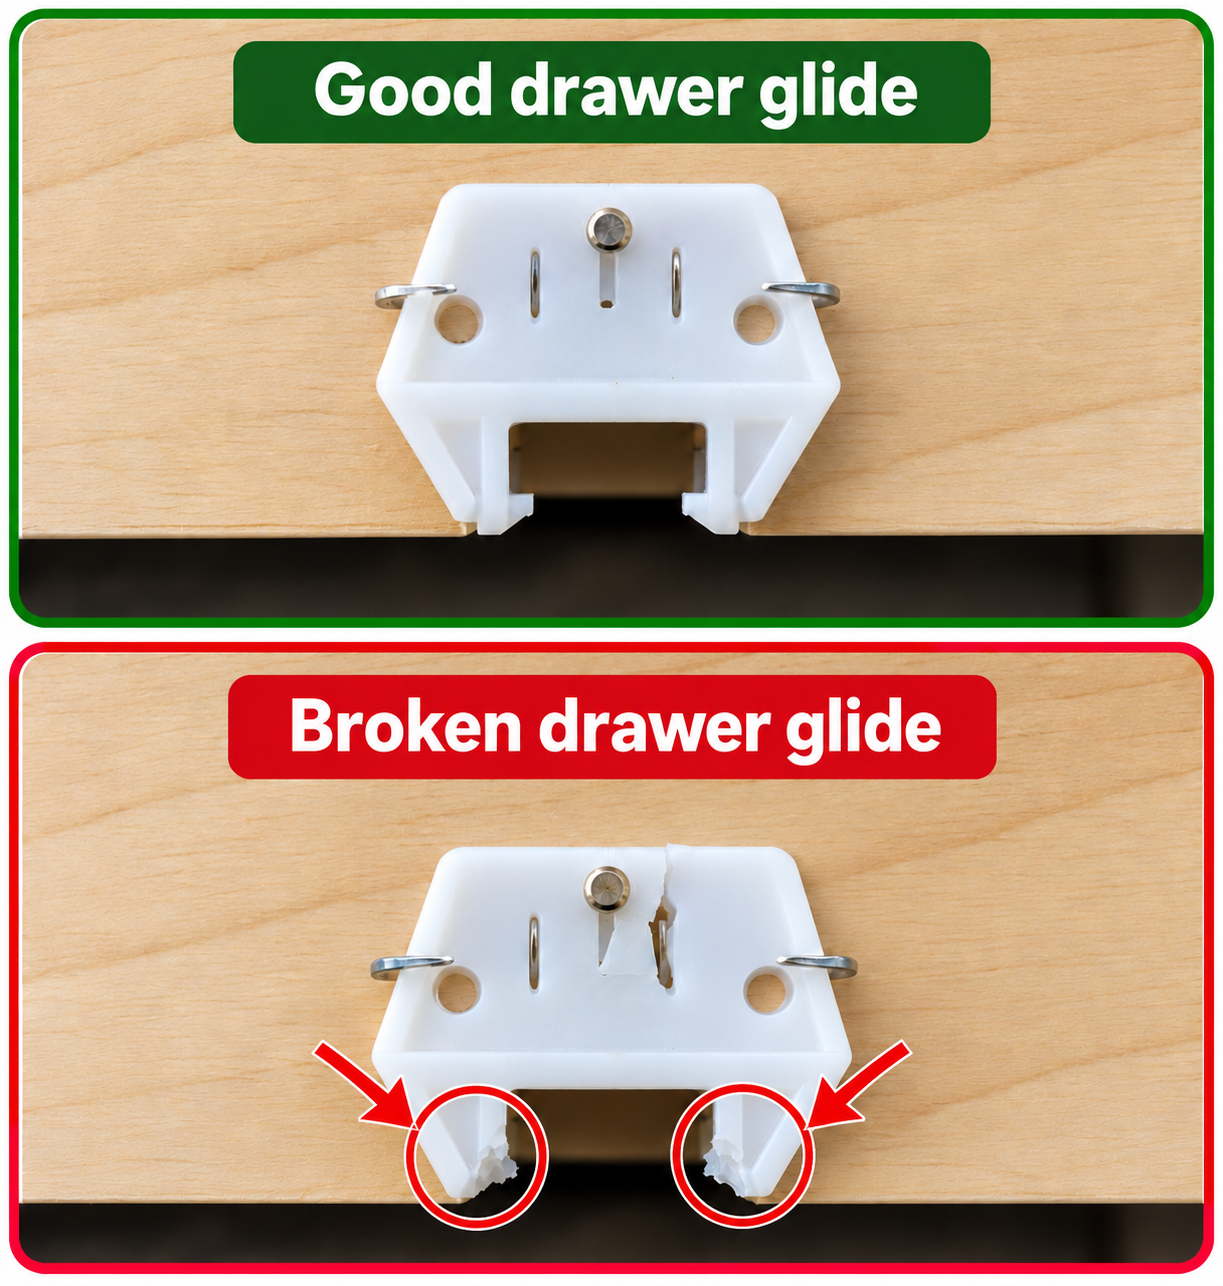
[INSERT GOOD VS. BROKEN DRAWER GUIDE PHOTO]
Here's what mine looked like. You can see the difference between the intact drawer guide and the broken one.
Thankfully, I didn't need to replace the drawer or the entire track. I just needed a new guide.
Supplies You'll Need
You don't need a bunch of expensive tools for this repair. Here's what I used:
Drill or screwdriver
That's it! If your dresser uses this style of drawer guide, it's a pretty inexpensive fix.
How to Fix a Broken Dresser Drawer
Step 1: Remove the Old Drawer Guide
First, carefully remove the drawer from your dresser.
Turn it around so you can see the back. You'll find the plastic guide attached near the bottom center of the drawer if yours has the same setup as mine.
Remove the screws or fasteners holding the broken guide in place.
I used my painter's tool to help loosen and remove the old piece. Seriously, if you don't own one of these tools yet, they're so handy for DIY projects!
Once the broken guide is removed, check for any remaining pieces of plastic or old fasteners.
Step 2: Adjust the New Drawer Guide
Here's where things get a little tricky.
Not all drawer runners are the same size, so finding the correct replacement guide can be frustrating.
That's why I love these adjustable drawer guides.
Instead of trying to find an exact replacement for the original plastic piece, you can adjust the guide to fit the width of your existing drawer runner.
Measure the runner and adjust your new guide according to the manufacturer's instructions.
Just make sure your dresser uses a compatible center-track system before purchasing a replacement.
Step 3: Install the New Drawer Guide
Now it's time to attach the new guide!
Position it where the original guide was installed, making sure it's centered and aligned with the drawer runner.
My replacement kit came with screws and nails for installation.
Secure the new guide using the appropriate fasteners for your drawer. If you're drilling new holes, be careful not to drill through the drawer itself.
The most important part is making sure the guide is positioned correctly. Even a small alignment issue can keep the drawer from sliding smoothly.
Step 4: Test Your Drawer
And now for the moment of truth!
Carefully slide the drawer back into the dresser, making sure the new guide engages with the runner.
Open and close it a few times to see how smoothly it moves.
If it doesn't slide correctly, don't panic! You may just need to remove the drawer and adjust the positioning of the guide.
Once everything lines up, your drawer should open and close without tipping or catching.
And just like that, you've fixed your broken dresser drawer!
Watch the Quick Drawer Repair Tutorial
Sometimes it's easier to see how something works than to read about it.
I put together a quick video showing exactly how I replaced my broken drawer guide.
Don't Throw Away That Dresser Just Yet!
I think this is one of those DIY repairs everyone should know about.
It's so easy to assume that when furniture stops working properly, it's time to replace it. But sometimes the solution is as simple as swapping out a tiny plastic part.
If you have a dresser drawer that keeps falling forward or won't slide correctly, take a look at the drawer guide before spending money on new furniture.
You might be surprised at how easy it is to fix!
This post contains affiliate links. I may earn a small commission from qualifying purchases at no additional cost to you.