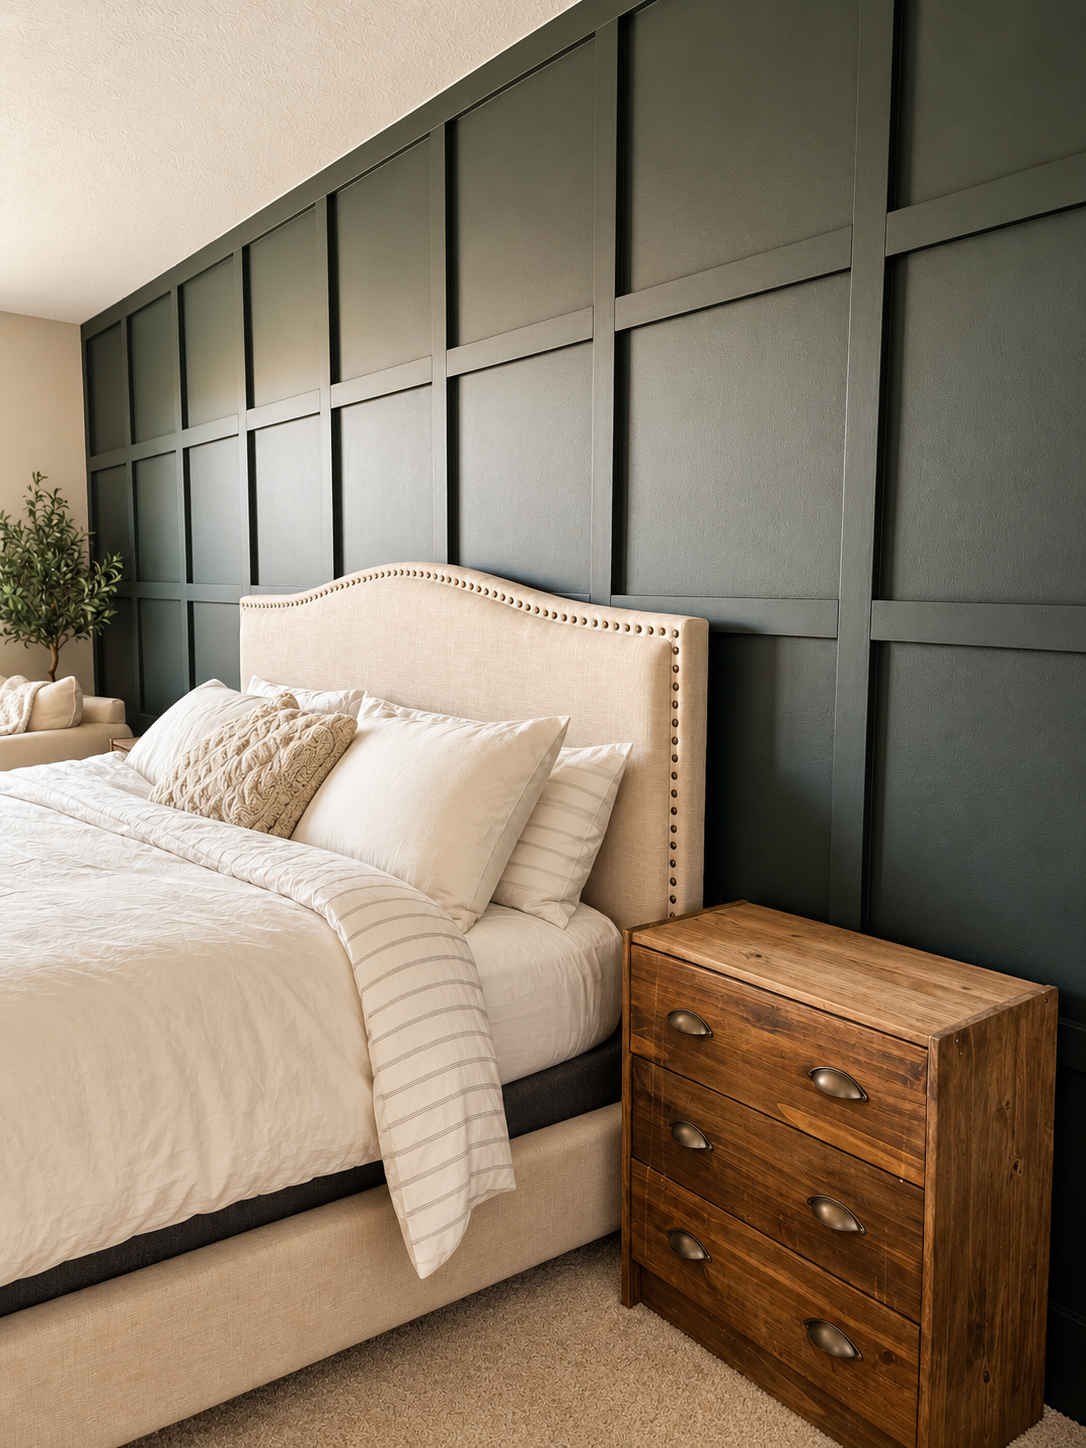
You know how some people use a few days home alone to relax, catch up on shows, or just enjoy a quiet house?
Apparently, I use that time to completely transform a bedroom. 😂
I had been wanting to add a DIY grid board and batten accent wall to our primary bedroom for what felt like forever. So when I found out my husband was leaving for a three-day work event, I decided it was the perfect opportunity to finally tackle it.
Was this a completely spontaneous decision? Absolutely.
Did I underestimate how much time I'd spend measuring, cutting, and caulking? Also yes.
But let me tell you, this DIY grid accent wall completely transformed our bedroom, and I couldn't love the finished result more!
The best part? I spent approximately $300 on materials and did the entire project myself.
If you've been wanting to create a board and batten grid wall but feel intimidated by the measurements, I'm going to walk you through exactly how I did mine, including the spacing formula I used and what I'd do differently next time.
Because trust me, I've learned a few things along the way!
What Is a Grid Board and Batten Accent Wall?
A grid accent wall is a type of decorative wall treatment created by installing vertical and horizontal trim boards in a repeating pattern.
The boards create a series of squares or rectangles that add texture and architectural interest to an otherwise plain wall.
I love this style because it's simple enough to work in almost any room but adds so much character.
For our bedroom, I wanted something that felt cozy, modern, and a little dramatic.
I chose Sherwin-Williams Jasper, a gorgeous deep, earthy green that gives the entire room a warm, calming feel.
And paired with the grid design? It's exactly what I was hoping for.
Materials and Tools You'll Need
Before getting started, here's everything I used to create my DIY board and batten wall.
Tools:
Miter saw (this is a great inexpensive option that I used for years)
Level
Measuring tape
Paintbrush
Sandpaper (220 grit)
Caulk gun
Safety glasses and hearing protection
Materials:
(20) 1x3x8-foot primed MDF or pine boards
Paintable white caulk (approximately 2 tubes)
Wood filler
Painter's tape
Paint — Sherwin-Williams Jasper
Optional construction adhesive, depending on your installation method
Total project cost: approximately $300.
I already owned my saw, brad nailer, and nails, so those weren't included in my materials total.
One thing worth mentioning: I actually used primed pine because my hardware store was out of MDF.
But if you're trying to keep costs down, primed MDF can be a great option for an interior accent wall in a dry room.
Just remember that MDF and pine have different characteristics, so choose whichever works best for your space and budget.
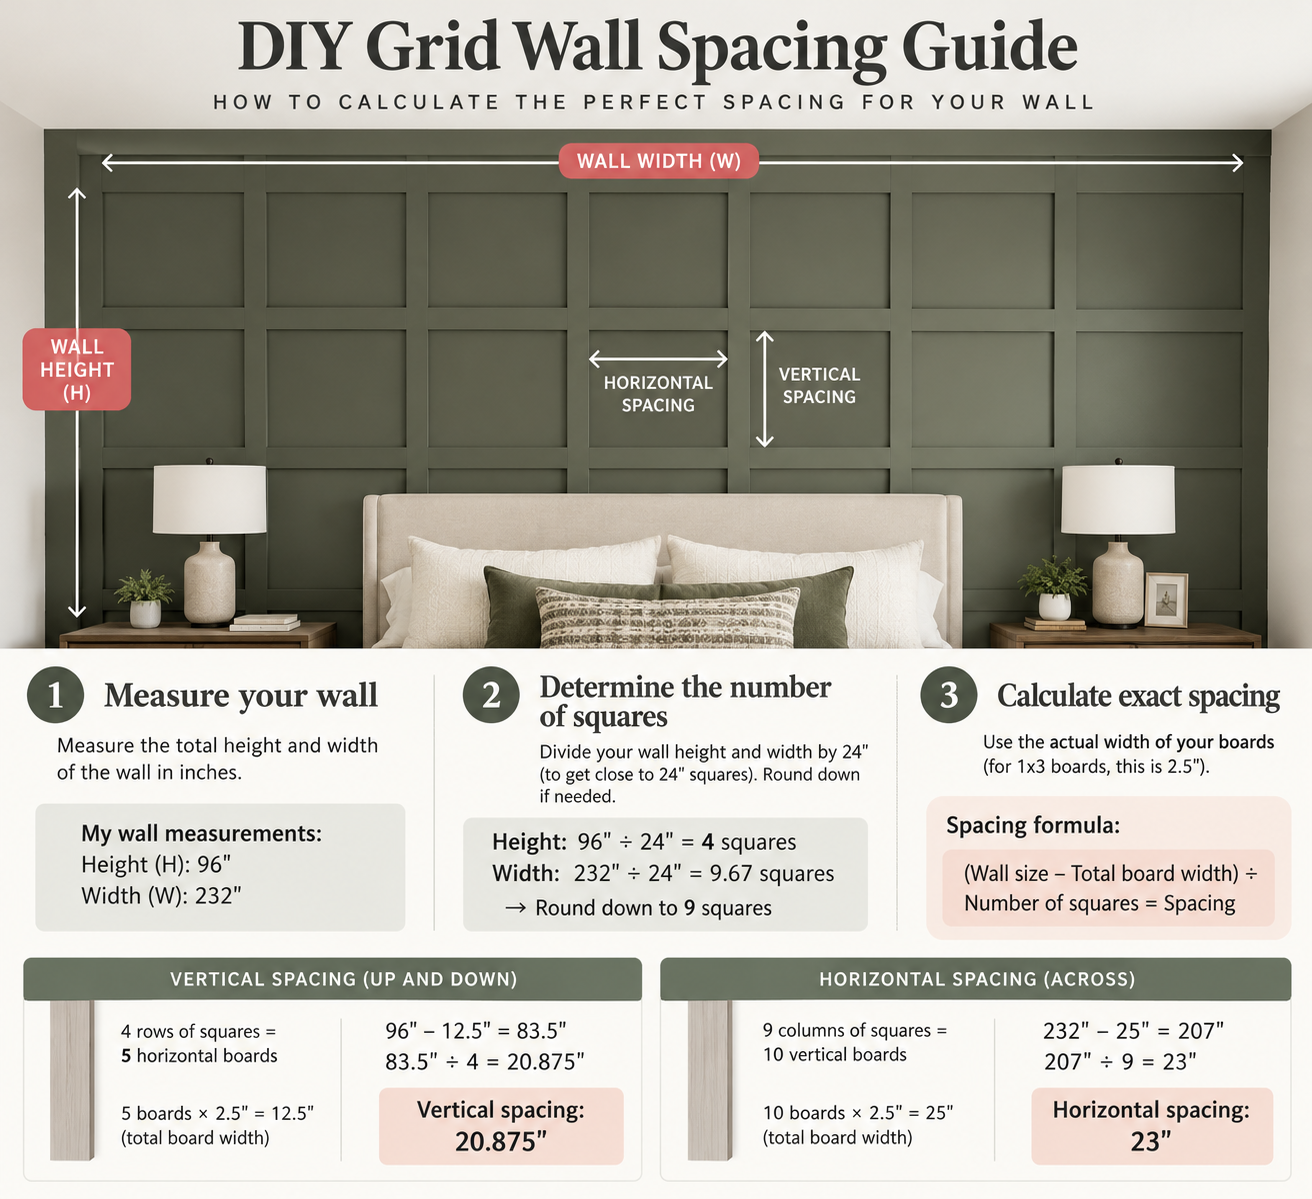
Step 1: Plan Your DIY Grid Accent Wall
Okay, I'm not going to sugarcoat this.
Planning the spacing was probably the hardest part of the entire project.
Not because the math is particularly complicated, but because you want everything to look even once it's installed.
And with a grid wall, those measurements matter!
Not a fan of math? I've got you! I created a free grid wall spacing calculator to take the guesswork out of planning your accent wall. Just enter your wall measurements, board width, and how many squares you want. The calculator will figure out the spacing for you!
DIY Grid Wall Calculator
Enter your measurements below to calculate your board and batten spacing!
Your Grid Wall Measurements
36 total openings
Measurements assume boards along all four edges of your wall. Measure individual openings before cutting.
My biggest planning tip: Draw out your grid on paper before making any cuts. Also, measure your wall in multiple locations because floors, ceilings, and walls aren't always perfectly level or square.
Step 2: Paint Your Wall and Trim Boards
Here's something I wish I did differently: paint all my boards before installing them.
Here's my reasoning.
When you have a wall with 36 individual openings, you're going to spend a LOT of time cutting in around the trim and takes hours if you aren’t using a sprayer (which I wasn’t). Lesson learned - paint all the boards before installing.
For this project, I used Sherwin-Williams Jasper, and the color is absolutely beautiful.
It's a rich, dark green that makes the room feel so cozy without being overwhelming.
I did paint the wall prior to installing the trim but I should I would have painted the boards too!
Step 3: Frame Out the Wall
With the measurements figured out and the boards painted, it was finally time to start installing!
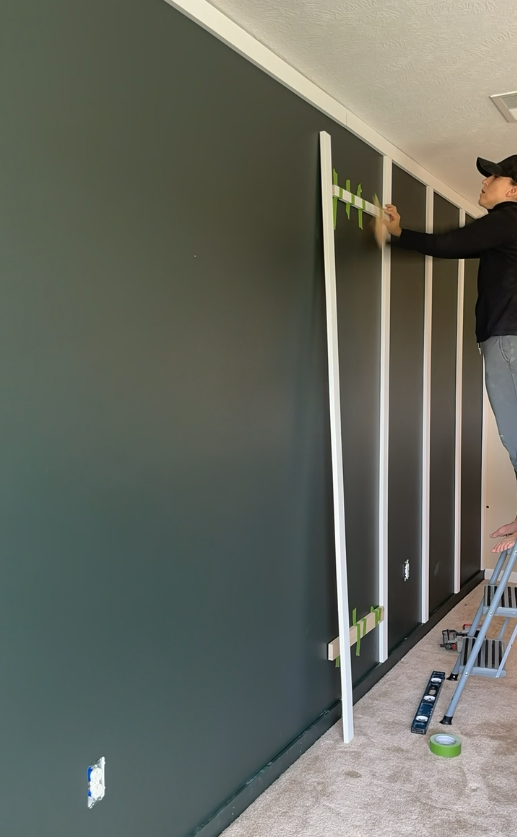
I started by creating the outside frame of the grid.
This gave me a defined perimeter to work within and helped establish where the rest of the boards would go.
I also made the decision to remove the existing baseboard along the accent wall so the new trim could sit flush.
You don't necessarily have to do this.
Depending on the profile and thickness of your existing baseboard, you may be able to work around it or create a transition.
For my wall, removing it gave me the cleanest look.
Why I Started With the Vertical Boards
My wall was over 19 feet wide, but only 8 feet tall.
That meant installing full-height vertical boards was much easier than trying to create continuous horizontal runs across the entire width of the room.
I used a level to position the boards and attached them with my brad nailer.
Whenever possible, secure trim into wall studs or appropriate framing. Brad nails alone may not reliably hold every board in drywall, so use an installation method suitable for your wall and trim.
You can also use construction adhesive as part of an appropriate installation method, but keep in mind that it can damage the drywall if you ever decide to remove the accent wall.
And knowing me, there's always a chance I'll want to change something eventually. 😂
Step 4: Cut Spacer Boards (Seriously, Don't Skip This!)
If you take only one tip away from this tutorial, let it be this one.
Make spacer boards!
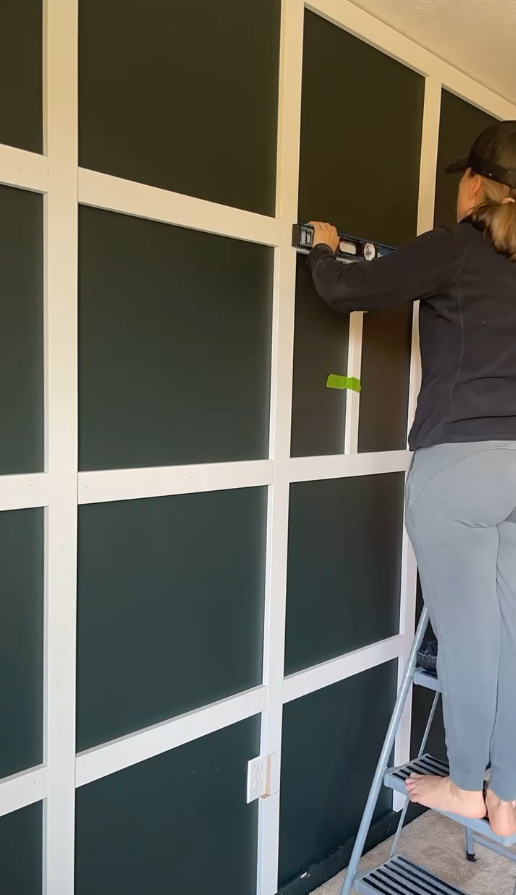
Instead of measuring every single gap over and over again, I cut scrap pieces of wood to match my calculated spacing.
For my project, I made spacers measuring:
20⅞ inches for the vertical spacing
23 inches for the horizontal spacing
I recommend making two spacers of each size.
These little pieces of scrap wood made the installation process SO much easier.
You simply position them between boards to help maintain consistent spacing as you work across the wall.
It's such a small step, but it saves a ton of measuring and helps prevent mistakes.
Just remember to check your layout with a level and measuring tape as you go. Spacers help with consistency, but small errors can still add up across a large wall.
Step 5: Install the Vertical Boards
Now for the fun part!
Well, mostly fun.
Remember how I mentioned that I was tackling this project while my husband was out of town?
That meant I was installing these long boards entirely by myself.
And let me tell you, holding an 8-foot board level while trying to nail it into the wall requires a little creativity.
Here's what worked for me.
Measure Each Board Individually
In a perfect world, every board would be exactly the same length.
But this is DIY, and walls are rarely perfect.
I found that my measurements varied by about ⅛ to ¼ inch depending on where I was working.
So instead of cutting every board to the same length, I measured each location individually.
Was it a little annoying running up and down the stairs to cut boards?
Absolutely.
Was it worth it to get a better fit?
Also yes!
Use Your Spacers to Hold Everything in Place
I used painter's tape to temporarily hold my spacer boards against the wall while positioning each vertical piece.
This helped me keep the spacing consistent and made it much easier to work alone.
Once everything was lined up and level, I attached the boards.
Then I repeated the process across the wall.
And slowly but surely, the grid started taking shape!
Step 6: Install the Horizontal Boards
After finishing the vertical boards, the horizontal pieces felt like a breeze.
Okay, maybe not a breeze, but definitely easier!
Since the horizontal pieces were shorter, they were much easier to handle by myself.
I measured each opening individually, cut the boards to fit, and used my spacer templates to help keep everything evenly positioned.
One thing I recommend is checking that your horizontal boards are level as you work across the wall.
Even if the spacing looks correct, a slightly crooked board can become really noticeable once the entire grid is finished.
Take your time here!
[INSERT VIDEO: Installing Vertical and Horizontal Grid Boards]
Step 7: Fill Nail Holes and Caulk the Seams
And now we arrive at the part of the project that tested my patience the most.
Caulking.
So. Much. Caulking. 😂
With 36 openings, plus all the perimeter trim, there were a LOT of edges to finish.
But this is also one of the most important steps if you want your DIY accent wall to look professionally installed.
Fill the Nail Holes
First, I filled the nail holes with wood filler.
Once the filler dried, I gently sanded the spots smooth using 220-grit sandpaper.
Caulk the Edges
Next, I applied paintable caulk along the seams where the trim met the wall.
This helps hide small gaps and gives the entire wall a more finished, built-in appearance.
I used a damp cloth to smooth the caulk and remove the excess.
A little tip: don't apply too much caulk at once. Smaller beads are much easier to control and clean up.
Also, use caulk for small trim-to-wall gaps, not as a substitute for filling large gaps or poorly fitted joints.
Was this the most exciting part of the project?
Definitely not.
But did it make a huge difference in the finished look?
Absolutely.
Step 8: Touch Up the Paint
We're almost done!
After the wood filler and caulk were completely dry and ready for paint, I went back through and touched up the trim.
Since I painted my boards before installing them, I didn't have to paint the entire thing from scratch.
However, there were still quite a few areas that needed attention, especially around the nail holes and seams.
I used my favorite paintbrush for the finishing work.
And after what felt like a million little touch-ups...
My DIY grid accent wall was FINISHED!
What I Would Do Differently Next Time
I learned a lot while tackling this project, and there are definitely a few things I'd do differently if I were building another grid wall.
1. I'd spend more time planning before starting.
Double-checking the measurements and board layout before cutting can prevent a lot of frustration later.
2. I'd make my spacer boards immediately.
Seriously, these were such a time-saver. I wouldn't attempt another grid wall without them.
3. I'd consider using a paint sprayer.
Painting the boards before installation worked well, but spraying the completed wall could save time if you have the right equipment and can properly protect the surrounding room.
4. I'd leave myself more time for finishing.
I completely underestimated how long filling nail holes, caulking, and touching up paint would take.
The installation is exciting because you see the wall come together so quickly. The finishing work? Not quite as exciting, but absolutely worth doing properly.
Was This DIY Grid Wall Worth It?
100% yes.
What started as a plain bedroom wall became one of my favorite features in our home.
I love how the grid adds texture and architectural interest without making the room feel too busy.
And the color? Sherwin-Williams Jasper was the perfect choice.
It's dark, earthy, cozy, and exactly what I wanted for our bedroom.
The entire project cost me approximately $300 in materials, and I completed it myself while my husband was away for a few days.
Would I recommend this project to someone who's relatively new to DIY?
Absolutely!
You'll need some basic tools, patience, and a willingness to double-check your measurements, but you don't need to be a professional carpenter to create a beautiful accent wall.
If you've been thinking about adding a board and batten grid wall to your bedroom, this is your sign to go for it!
And now that the wall is complete, I can finally move on to the nightstands I attempted to refinish five years ago...and completely failed at.
Because apparently, one project is never enough around here. 😂
Stay tuned for that makeover!
This post may contain affiliate links, which means I may earn a small commission if you purchase through my links, at no additional cost to you.